Last updated: September 10, 2026
Key Takeaways
- Push 2 inches in one shot, and you risk cracking the slab or building a hump.
- Ports may sit several feet apart, often around 2 to 4 feet depending on slab size and the condition of the voids.
- Polyurethane foam weighs far less than a cement slurry, so it puts less load on weak subgrade.
- Polyurethane foam injection works because the material expands after it is injected, but before it fully cures; if you are unsure about a slab’s condition, consult a qualified concrete leveling professional.
Polyurethane foam injection concrete leveling: how it works begins with filling voids under the slab, then lifting it in small, controlled increments, and finally hardening into a lightweight support layer. Need a plain answer for a driveway, sidewalk, garage floor, or patio that has dropped 1/2 inch to a few inches? This polyurethane foam injection concrete leveling: how it works explanation is the one to read.
Who this applies to, and what I’m assuming you already know

Use this for concrete slabs that are still basically intact but no longer sitting where they should because the soil under them has compressed, washed out, or shrunk. Driveways with one corner that has sunk. Front walks that trip people at the joint. Garage floors that pitch toward the door. Patios that have settled near the house. I am not talking about broken slabs that are crumbling into pieces or structural foundations with serious movement.
And I’m also assuming you want enough information to judge a contractor’s plan, not to turn yourself into a specialist overnight. The method is simple in concept, sure, but the details carry the weight: where the void is, how much lift is safe, how the injection points are spaced, and whether the slab can take being raised at all. A good crew is usually working with 5/8-inch to 1-1/2-inch holes, not tearing up the whole slab.
Usually, this approach fits when the concrete is sound, the settlement is moderate, and access is straightforward. It is a poor fit when the concrete is badly cracked, the soil keeps moving because drainage is wrong, or the slab is tied into a larger structural problem. In those cases, foam is not a cure; it is a bandage over a bruise that keeps getting hit, so a qualified concrete leveling professional should evaluate the underlying cause first.
Compared with mudjacking, the big difference is weight. Polyurethane foam is much lighter than a cement slurry, so it adds less load to weak subgrade. That matters on fill soils, older slabs, and areas where repeated settlement is already part of the story. According to the U.S. Department of Transportation’s geotechnical guidance, controlling water and support loss is central to slab performance, which is why drainage matters as much as the lift itself.
What polyurethane foam injection actually does under the slab
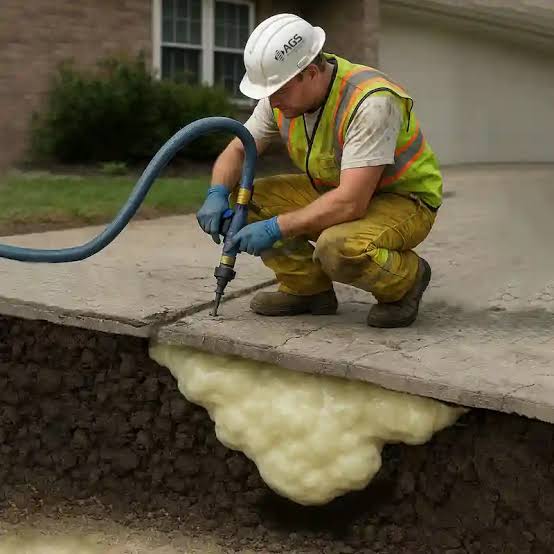
Under the slab, polyurethane foam injection fills voids so the concrete can be lifted back toward grade. The installer drills small holes through the concrete, sets a nozzle or injection port into each one, and pumps in a two-part resin. The parts mix at the gun or at the tip, then react and expand into a rigid foam. That foam moves into empty spaces, presses against the underside of the slab, and can raise the concrete as the operator controls pressure and volume.
Void fill is the technical term you will hear. It simply means empty space beneath the slab. Sometimes the gap is thin, caused by erosion. Sometimes the slab has settled enough that a tap gives a hollow sound. In either case, the foam is doing two jobs: filling the gap and transferring load back into the soil.
The lift happens gradually. A contractor does not usually inject foam blind and hope for the best; the work is typically handled by a trained operator who watches the slab edges, joints, and nearby markers while moving from one port to the next. On many jobs the slab is raised in fractions of an inch, then checked before more material goes in. Slow control. That is the whole point. Force 2 inches all at once, and you can crack the slab or create a hump.
Limits still apply. Foam will not rebuild missing concrete, and it will not stabilize soil that is constantly wet from a broken downspout or poor grading. It also cannot correct a slab that was poured badly from day one and is missing reinforcement where it needs it. What it can do is restore support under a settled slab quickly, often with same-day or next-day use in light-duty areas. The University of Minnesota Extension notes that managing water at the source is key to preventing repeated settlement, so a repair that ignores drainage may not last.
The job is usually cleaner than demolition and replacement. Small holes. Minor patching. No hauling away the slab. But “less invasive” does not mean “simple.” The result depends on reading the slab, the soil, and the amount of lift correctly.
How does polyurethane foam raise concrete?

Polyurethane foam raises concrete by expanding into a closed cell matrix that pushes against the underside of the slab. Closed cell means most of the tiny air pockets are sealed off from one another, which helps the foam resist water absorption better than a porous fill. That matters in places where moisture is part of the settlement story.
The installer usually starts at the lowest point and works toward the target grade. Ports may be spaced several feet apart, often around 2 to 4 feet depending on slab size and the condition of the voids. The foam enters the void, spreads laterally, and begins lifting the slab when it meets resistance. The operator stops, checks level, and decides whether another small shot is needed.
A good lift is controlled and even. You want the slab to come back to level or close to level without rocking. Rocking means one area is supported while another still hangs in the air. A problem sign is obvious: the void has not been fully addressed, or the foam path missed the weak spot.
The chemistry matters too, though a homeowner does not need a chemistry lesson to judge the result. The resin cures fast, often within minutes, which is why the crew can keep moving and why the slab can often be used the same day, though cure times vary by product, temperature, and site conditions. Useful, yes. But there is a trade-off: once the foam starts to expand, there is not much room for error. Miss the target, overfill a pocket, or inject too fast, and the slab can heave.
I would be cautious around any contractor who talks only about “lifting” and never about drainage, voids, or soil cause. Foam is the fix under the slab. It is not the whole fix if water is still running under the concrete every storm, and the American Concrete Institute has long emphasized that moisture control and support conditions affect concrete performance.
How the job is done, step by step
The work should follow a predictable order, and a crew that skips steps is usually asking for trouble.
- Map the settlement and the target grade. The crew marks the low spots, measures the drop with a level or laser, and decides how much lift is realistic, often within 1/8 inch to 1/4 inch at a time. Make sure they know the desired finished height relative to doors, garage slabs, or adjacent walks. A problem sign is a vague plan like “we’ll bring it up until it looks right.”
- Inspect for cause before drilling. They should look for downspout discharge, broken irrigation lines, poor slope, and visible erosion at edges. Confirm that the water issue is identified, because a slab that keeps losing support will settle again. A problem sign is a quote that ignores drainage entirely.
- Lay out injection points. Holes are typically drilled through the slab in a pattern that gives even coverage, often 5/8 inch to 1-1/2 inch in diameter depending on the system used. Verify the holes are not placed too close to slab edges or control joints. A problem sign is a layout that seems random or too sparse for the size of the slab.
- Drill cleanly through the slab and clear debris. The holes should reach the void area without blasting the concrete apart. Check that dust and loose chips are removed so ports seat properly. A problem sign is spalling around the hole or cracked edges from careless drilling.
- Inject foam in short bursts. The operator pumps small amounts and watches for movement, often checking after each few seconds of injection. Make sure lift happens gradually and evenly. A problem sign is a fast, continuous shot that causes a sudden jump.
- Check level repeatedly during the lift. The slab should be checked from multiple points, not just at the edge. Confirm that the surface stays within the intended correction and does not develop a crown. A problem sign is a visible hump or a corner that rises higher than the rest.
- Fill remaining voids and recheck support. After the main lift, the crew may add smaller amounts to stabilize soft spots and ensure there is no hollow area left. Verify the slab no longer rocks and sounds more solid when tapped. A problem sign is a spot that still feels spongy or sounds hollow after the lift.
- Patch the holes and clean the surface. The drilled openings are usually filled with a matching concrete patch or mortar. Verify the patch is flush and the slab edges are cleaned off. A problem sign is a rough plug that sticks up or falls out later.
On a typical residential slab, the whole process may take a few hours, though larger or more damaged areas take longer. The right result is not “as high as possible.” The right result is level, stable, and not stressed.
What should I ask before I hire someone?
Ask about cause, lift limits, and how they will prove the slab is supported when they finish. Those questions tell you more than a generic sales pitch ever will.
I’d start with three direct questions: How will you find the voids, how much lift do you expect, and what happens if the slab does not respond evenly? A contractor who does this work regularly should be able to answer in plain language. And if they cannot explain why the slab settled, they may be treating the symptom, not the source, so it is worth getting a second opinion from a qualified concrete leveling professional.
Ask what size holes they drill and how they patch them. Small holes are normal in foam injection, and patching should not leave raised blobs or visible damage that looks worse than the settlement did. Ask whether they use a laser or another level reference to monitor movement. “Eyeballing it” is not a plan.
Ask whether the price changes with the number of injection points, the amount of lift, or the need for extra void fill. That is normal. Jobs are not priced like a sack of gravel. A short sidewalk lift is not the same as a long driveway edge that has washed out and needs multiple passes.
Ask what will happen if drainage is still bad. A thoughtful contractor will talk about gutters, downspout extensions, grading, or runoff control. If they promise a permanent fix while ignoring the water problem, you are buying optimism, not repair.
Ask what the surface will look like after the work. Small drilled patches are expected. Big mismatched patches, cracked corners from over-lift, and a wavy slab are not.
When should I stop and choose a different fix?
Stop and choose a different fix when the slab is too damaged, the soil is too unstable, or the movement is not a simple settlement problem.
The concrete is broken into multiple loose sections: That means the slab itself has failed, not just the support beneath it — remove and replace, or repair as a structural concrete job.
The slab keeps moving after heavy rain: That points to an ongoing drainage or washout problem — fix the water path first, or the foam will be a short-lived patch.
There are large vertical offsets at control joints or cracks: That suggests more than a minor level issue, and the slab may not lift evenly — get a structural assessment before injecting anything.
The area is a foundation wall, footing, or load-bearing structural element: That is not ordinary slab leveling — use a qualified structural repair approach, not a standard walk or driveway lift.
The concrete is thin, badly scaled, or crumbling at the surface: The slab may not tolerate drilling and lift pressure well — replacement may be the safer option.
The site has unstable fill, sinkhole conditions, or recurring underground voids: Foam can fill space, but it cannot solve a moving geologic problem by itself — the underlying ground issue needs a more serious fix.
In a freeze-thaw region, the line between one-time settlement and ongoing moisture trouble matters even more. Repeated freezing and thawing make water management and soil drainage non-optional details. A slab sitting in wet subgrade is more likely to move again after the next wet season.
The mistakes I see people make, and what they cost
The most common mistake is trying to lift a slab that needs support repair first. If the drainage problem remains, the slab can settle again in one season, and you pay twice. The better move is to solve runoff, gutter discharge, or grading before or alongside the lift.
Another mistake is pushing for a perfect cosmetic result when the slab is already cracked and stressed. That can turn a small level correction into a visible crack line or a raised edge. Better goal? A safe, functional surface with a modest, even correction.
A third mistake is ignoring joint behavior. If a control joint is already acting like a hinge, over-lifting one side can create a hump or a new break. The smarter path is slower, smaller lifts with repeated checks.
A fourth mistake is assuming all voids are the same. A shallow edge void behaves differently than a deeper washout pocket under the center of a slab. If the crew injects only at the visible low spot, they may miss the real problem area. The better approach is to map the whole affected zone.
A fifth mistake is choosing foam when the slab is simply the wrong candidate. A crumbling patio with widespread scaling is not a good foam job. Replacement may cost more up front, but it avoids paying to stabilize a slab that should have been removed.
And the last mistake is not asking about the finish. Holes should be patched cleanly, and the slab should not be left rocking or visibly crowned. A “fixed” slab that is still unstable is not fixed.
How long does it take, and what does a good result look like?
A typical residential foam injection job often takes only a few hours, but the exact time depends on slab size, access, and how much support needs to be restored. A small sidewalk panel may be done quickly. A long driveway edge with multiple low spots and a drainage issue will take longer because the crew has to work in stages and verify the lift at each point.
Price varies with square footage, number of injection points, amount of settlement, site access, and whether the job needs extra void fill or drainage correction. I’d expect a contractor to explain the pricing formula instead of tossing out a number that sounds like it came from nowhere.
A good result looks boring in the best way. The slab sits at the right height, the trip edge is gone, the surface does not rock, and the patches are barely noticeable once they cure. If the work was done well, you should not be thinking about the foam at all six months later. For larger projects, ask for the measured before-and-after elevations so you have a record of how much the slab moved and whether the result matched the target grade.
If you want to compare options, ask whether the contractor has handled a job like yours on a driveway, sidewalk, garage floor, or patio with a similar amount of settlement. The best answer is specific, not generic: the kind of slab, the amount of drop, the lift achieved, and what happened after the first rainy season.